After fuel filter changes, running out of fuel, or system service, air enters the fuel system and prevents injectors from building pressure. When this happens, the engine will crank but not start. Before assuming a failure, start with the Master Marine Diesel Troubleshooting Guide to confirm whether the issue is air intrusion, fuel delivery failure, or priming procedure error.
At 805 Marine Diesel Mechanic, improper priming is one of the most common causes of no-start conditions across Ventura, Oxnard, Channel Islands Harbor, and Santa Barbara. In many cases, the engine is mechanically sound—but trapped air is preventing proper injection pressure, similar to symptoms seen in crank-no-start conditions or no smoke while cranking.
Why Priming Is Critical in Marine Diesel Engines
Marine diesel fuel systems rely on solid, air-free fuel to maintain injection pressure. Even small amounts of air compress instead of transferring pressure, which prevents injectors from atomizing fuel correctly.
- Air in system = no injection pressure
- No pressure = no combustion
- No combustion = crank/no start
This is why priming must be done correctly and completely.
Understanding Fuel System Flow Path
Priming must follow the natural flow path of the system:
- Fuel tank → primary filter
- Primary filter → lift pump
- Lift pump → secondary filter
- Injection pump → injectors → return
Any air trapped along this path must be removed sequentially, or the system will not stabilize.
This process overlaps with issues seen in fuel pressure loss and engine stall after startup.
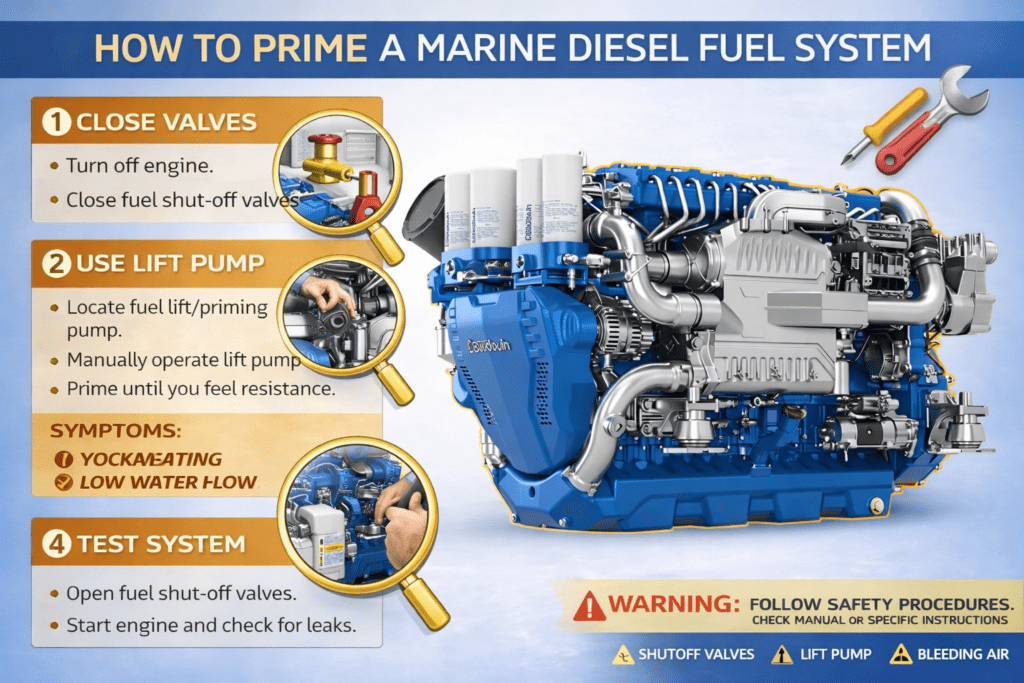
Step 1 — Verify Fuel Supply and Valve Position
Before priming, confirm the system is capable of delivering fuel.
- Check tank level
- Confirm valves are open
- Inspect fuel manifold position
Incorrect valve positioning is a frequent cause of failed priming attempts.
Step 2 — Inspect Filters and Seals
Improper filter installation introduces air into the system.
- Loose filter seals
- Dry O-rings
- Improper filter seating
This often leads to recurring air intrusion similar to hidden fuel leaks.
Step 3 — Use Manual or Electric Lift Pump
Priming pumps push fuel through the system and force air out.
- Pump continuously
- Watch for resistance increase
- Listen for steady flow
If resistance never builds, there may be a leak or blockage in the system.
Step 4 — Bleed Air at Key Points
Air must be removed at the highest points in the system.
- Secondary filter bleed screws
- Injection pump bleed points
- Fuel rail fittings (if applicable)
Fuel should flow without bubbles before tightening fittings.
Step 5 — Prime Injection System (If Required)
Some engines require cracking injector lines during cranking.
- Loosen injector fittings slightly
- Crank engine briefly
- Tighten once fuel flows clean
This step must be done carefully to avoid safety risks.
Step 6 — Verify Return Flow Stability
A fully primed system will show stable return fuel flow.
If return flow is inconsistent, air may still be present.
This condition often overlaps with idle instability and throttle hesitation.
Common Priming Mistakes
- Stopping too early before air is fully removed
- Ignoring small leaks in fittings
- Overtightening bleed screws
- Failing to pre-fill filters when allowed
These mistakes often lead to repeat no-start issues.
When Priming Doesn’t Fix the Problem
If the engine still won’t start after proper priming, the issue may be deeper:
- Lift pump failure
- Injection pump problems
- Severe air leaks
- Fuel system blockage
This requires further diagnosis using advanced diagnostic testing.
Technician Diagnostic Workflow
- Confirm fuel supply integrity
- Check for air intrusion points
- Verify lift pump operation
- Bleed system completely
- Test injection pressure
- Confirm return flow stability
This process ensures the system is fully restored before startup.
External Authority Resources
Cummins Marine Engines |
Caterpillar Marine Systems
20 Responses